
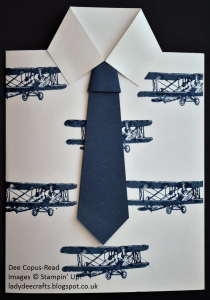
 Please bear with me as this is my first attempt at writing a tutorial, I hope it will be helpful. If you have any questions please leave a comment and I will get back to you as soon as I can.
 SHIRT
For the card base I used a full sheet of A4 cardstock and folded it in half. UK cardstock measures 11 ¾” x 8 ¼” but this will work with 11” x 8 ½” cardstock too. Because I was making a few of these cards I found it easier to make a template.
- For the template I cut a strip of card 1 ¼” x 11 ¾” and folded it in half.
- From the centre fold line I measured 1 ¼” towards the right and made a mark, I then measured 1 ¼” in from the right hand side of the template and made another mark.
- I also made another mark for the centre of the card front – this is so I could see where the points of the collar need to meet. I forgot to add the centre point when I first started taking the photo’s but the picture below shows how I should have done it : )

I placed the template at the top of my card stock and drew a pencil line from the 1 ¼” mark just after the fold line to the left hand edge of the cardstock and another line from the right hand 1 ¼” mark. I cut along both of the lines and then removed the panel from the back of the card base (see photo below).

For the collar I lined the template up to the 2 lines I had cut and gently started to pull the top left and right hand corners towards the ‘centre’ mark on my template (see photo below).

Once the 2 points of the collar met at the ‘centre’ of the card front I took my bone folder and gently burnished each side in an upwards direction to give a crisp crease (see photo below). Don’t stick the collar down yet because the tie needs to be adhered underneath the collar first.

TIE
For the tie you will need 1 piece of cardstock/DSP 5 ¼” x 1 ½” and 1 piece 7/8” x 2”. At one end of the 5 ¼” piece I put a mark ¾” up on each side. I draw a line from each mark to the centre. At the other end I measured 3/8” in on each side and drew a line on each side (see photo below).

TIE KNOT
Onthe 7/8” x 2” piece I measured 5/8” in from each side and made a pencil mark. To give the knot a bit of dimension I placed a dimensional in between the 2 pencil marks and attached the tie. I put some fast fuse on each side flap and folded them loosely around the tie, keeping to the angle of the tie (see photos below). You will need a strong adhesive to secure them.


I stamped the ‘Sky is the Limit’ plane onto the shirt, I stamped the first image it the centre of the shirt and worked from there. I used night of Navy ink.
I placed a dimensional on the back of the tie towards the bottom and used fast fuse on the back of the knot. I placed the tie underneath the collar making sure it was central and straight and adhered to the card. I then used fast fuse to adhere the collar.

I also stamped the image on the front of the envelope and inside the card too. I think it gave it a more professional finish.

You could also make this card and add a bow tie instead of the tie.
***
I hope you liked this tutorial.
If you would like to order any of the products I used please click on the product picture below and it will take you straight to my online store where you can shop 24/7 and have the products delivered straight to your door.
If you would like to order any of the products I used please click on the product picture below and it will take you straight to my online store where you can shop 24/7 and have the products delivered straight to your door.
If you decide to make a shirt card I would really love to see a photo, you can email your photos to LadyDeeCrafts@outlook.com
Thank you for reading this
Dee x
Products used:
Built for Free Using: My Stampin Blog
