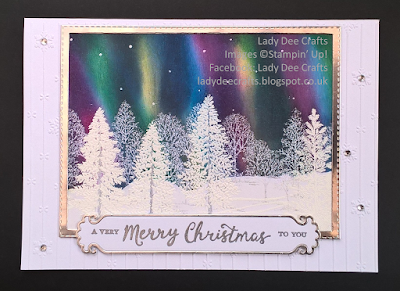
I have finally managed to finish my Northern Lights Christmas card that I started at the beginning of the week.
I wanted to try the emboss-resist technique so I cut a sheet of Whisper White cardstock in half and heat embossed the tree images on both pieces.
I sponged the northern lights on one of them but when I was finished 2 of the trees looked pink so I threw it away and sponged the northern lights on the other piece. Again I had pink trees so I posted a photo of it on Pootles Craft Forum because there are so many talented artists on there and I knew they would give me some advice. Tracy Elsom commented advising me that Melon Mambo and the retired Blackberry Bliss inks cause this because they have a really strong pigment. Guess who used both of these colours : ) I thought I was going to have to throw it away and start again but thanks to Tracy’s advice I could continue making the card. YAY!
I left a comment on the Forum saying I would finish it on Wednesday but I was unwell. On Thursday morning I realised I had 2 very special birthday cards to make for Saturday so those took priority.
To make the focal image I started by stamping the row of trees, from the Lovely as a Tree stamp set, with Smoky Slate ink and heat embossing them with clear embossing powder. The trees on the left are from the Thoughtful Branches stamp set and I stamped the 3 tree trunks with silver ink and used clear embossing powder. I stamped the leaves with Whisper White Craft Ink and heat embossed with white embossing powder. For the tree on the right I used White Craft Ink and heat embossed with white embossing powder, this image is also from the Lovely as a Tree stamp set.
Tip: Instead of buying lots of embossing powders in different colours use your Stampin’ Up! Stampin’ pads and heat emboss with clear embossing powder.
To make the northern lights background I used So Saffron, Pacific Point, Blackberry Bliss, Melon Mambo, Emerald Envy and Night of Navy inks.
I started with the So Saffron ink and sponged 2 diagonal lines then I sponged Pacific Point ink so that it overlapped some of the So Saffron. To make the green brighter I went over it with Emerald Envy ink. I then sponged some diagonal lines with Melon Mambo and added a small amount of Blackberry Bliss ink. To make some of the areas darker I sponged a few vertical lines using a sponge dauber and night of navy ink.
My first thought was to make this into an easel card but when I laid it against the card base it didn’t look right so I laid it on an A5 card base and I didn’t like that either. There was something missing but I couldn’t put my finger on it. I started to get frustrated with it so I made a coffee then went back to it about half an hour later. I looked at the Thoughtful Branches Northern Lights card I had made a few days before and had a ‘light bulb moment’, it needed a frame.
I die-cut a silver frame and adhered it using multi purpose glue, I was really happy with how it finished it off. The sentiment comes from the Reason for the Season stamp set which is in the 2016/17 Annual Catalogue. I stamped the sentiment on Whisper White cardstock with silver ink and heat embossed it using silver embossing powder. I die-cut the sentiment and then die-cut another out of the silver foil sheets to frame the sentiment.
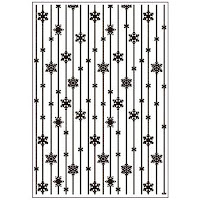
The card base looked too bare so I embossed a piece of Whisper White cardstock with the Frosted Stripes Embossing Folder. I really love this embossing folder, I think it looks very pretty and elegant. I adhered the focal image with multi purpose glue and added a Rhinestone to the centre of each snowflake.
I wanted to attach the sentiment centrally onto the frame so I added a piece of tear and tape across the centre of it and I cut some dimensionals in half and added them along the bottom edge.
I had so much fun sponging the northern lights background, even if it was rather messy – this is how my hands looked after scrubbing them several times.
I really like this card and I hope you do too, I would love to know what you think. If you have any questions please leave them in a comment and I will get back to you as soon as I can.
I hope you find some time to have some crafting fun too, maybe you will give it a try.
Thank you for visiting today.
Dee x
If you would like to purchase any of the Stampin’ Up! products I used to make this card click on the image below:-

 I have finally managed to finish my Northern Lights Christmas card that I started at the beginning of the week.



You've done it again. Another beautiful card. Love the "Northern Lights".