The Cracker Top Lidded Boxes I designed for July’s InspireINK Blog Hop were really popular and I received so many requests for a tutorial. Today I’m happy and relieved to have finally finished this step-by-step tutorial for you.
This is a huge in-depth tutorial with lots of photos and templates to help you along the way. If you have any questions or are not sure of something please get in touch by leaving a comment below or you can email me – LadyDeeCrafts@outlook.com

Please read the tutorial before making this project.
If you would like to see a larger version of the photo’s or templates in today’s tutorial I have added a gallery at the bottom of this post, click on the image to enlarge it.
If you CASE (Copy And Share Everything) this project please include my name and a link to this blog post –
http://www.ladydeecrafts.co.uk/?p=15736
I would love to see your creations, you can email your photo’s to LadyDeeCrafts@outlook.com or tag me #ladydeecrafts on social media.
Legal Stuff: This tutorial is the property of Diane Copus-Read and is for Personal Use only. No part of this tutorial may be reproduced, distributed or transmitted in any form or by any means including photocopying or other electronic or mechanical methods, without prior written permission of the publisher. For permission requests contact me at LadyDeeCrafts@outlook.com
Really useful tip before making ANY project
In the past if I was CASEing a project I would always reach for my Stampin’ Up! cardstock first but not anymore.
There were a couple of tutorials I found where there was more than 1 measurement error. These were big projects involving lots of cardstock and DSP but I didn’t realise until I had cut and scored everything. This was a costly lesson to learn.
If I CASE a project now this is what I do:-
- Make it first with cheap cardstock or one of the colours in a multipack of cardstock that I don’t like.
- The Stampin’ Up! cardstock or DSP only comes out when I’m confident that the project works.
This might seem like a lot of work but it’s better to use several sheets of cheap cardstock and keep hold of the good stuff.
* * *
My Cracker Top Lidded Boxes were made with Stampin’ Up! cardstock and DSP, if you are using something else you may need to adjust some of the measurements slightly in this tutorial.
I check and double-check all the measurements in my blog posts but I have Dyscalculia, it’s easy to make mistakes when typing up so many measurements. I suggest using my tip above before making these with your good cardstock or DSP.
Cracker Top Lidded Box Tutorial
Making the Box Base
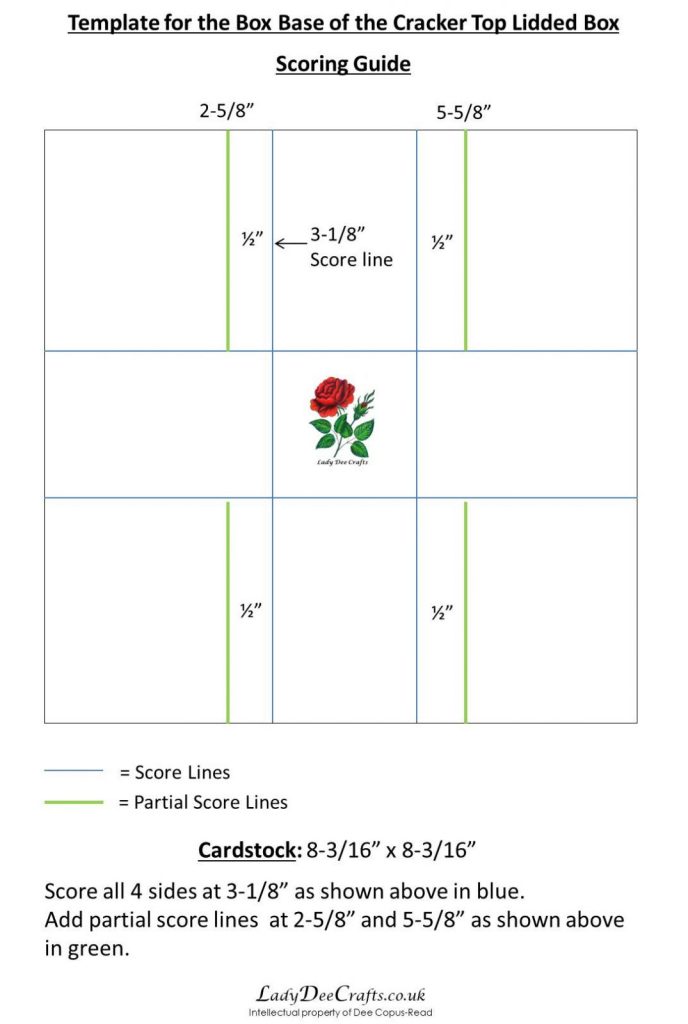
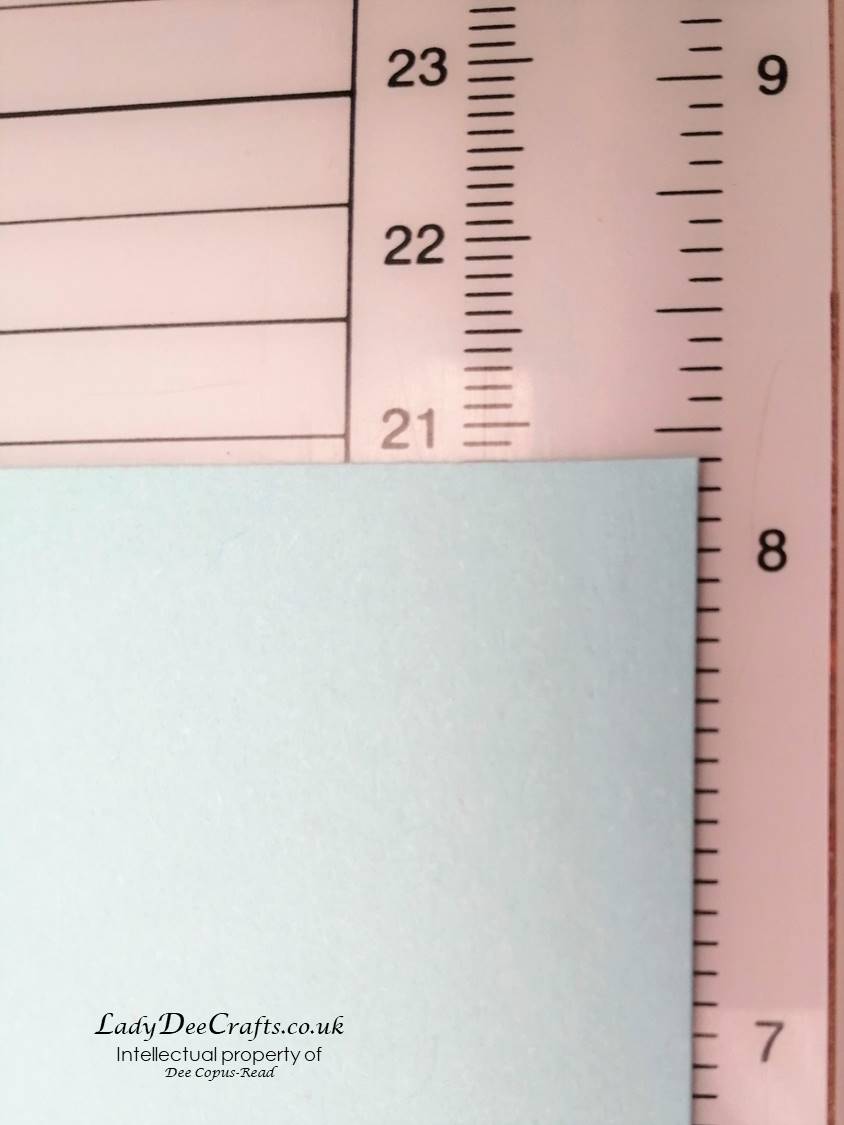
Cardstock: 8-3/16″ x 8-3/16″ (20.8cms x 20.8cms) – see picture below.

- Score all 4 sides of the cardstock at 3-1/8″ (score the 1st side at 3-1/8″, rotate 90° and score at 3-1/8″, do this for all 4 sides).
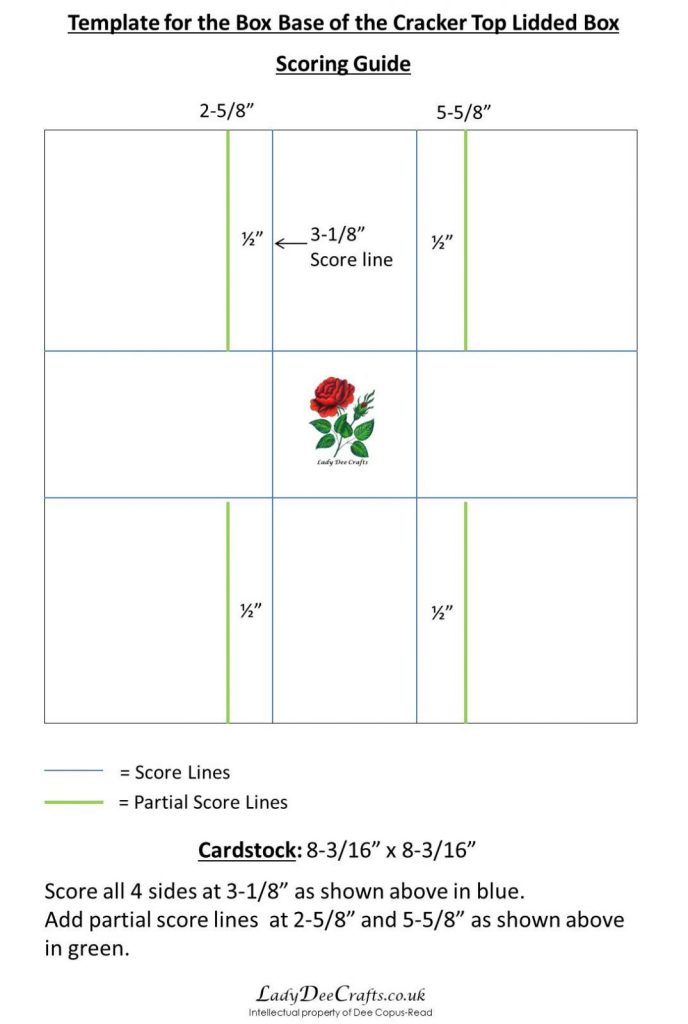
- You then need to add partial score lines, these will make the tabs for adhering the box. On 1 side score down to the 1st scoreline at 2-5/8″ and 5-5/8″. Do this on the opposite side too – see the Scoring Guide template below.
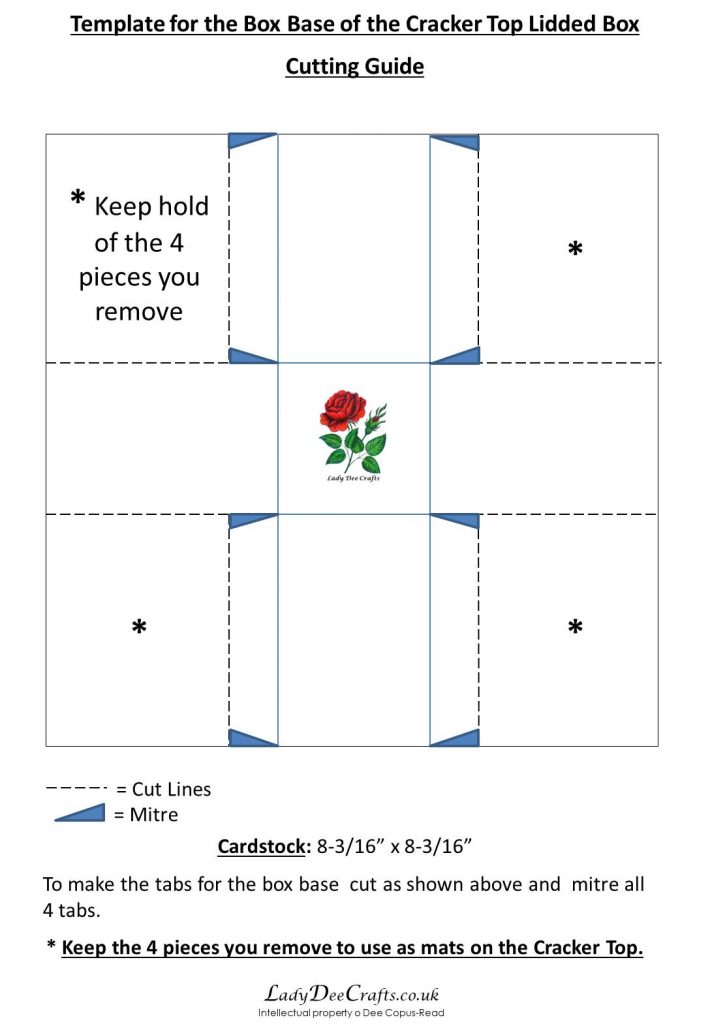
The black dash lines on the Cutting Guide template below show where you need to cut and mitre to make the tabs.

Keep hold of the 4 rectangular pieces of cardstock that you remove (shown with an * in the template above).

Fold all the scorelines and burnish with a bone folder.
With the front of the box facing upwards add adhesive to all 4 tabs. I used double-sided tape and liquid glue because it gives a little bit of time to align each tab.
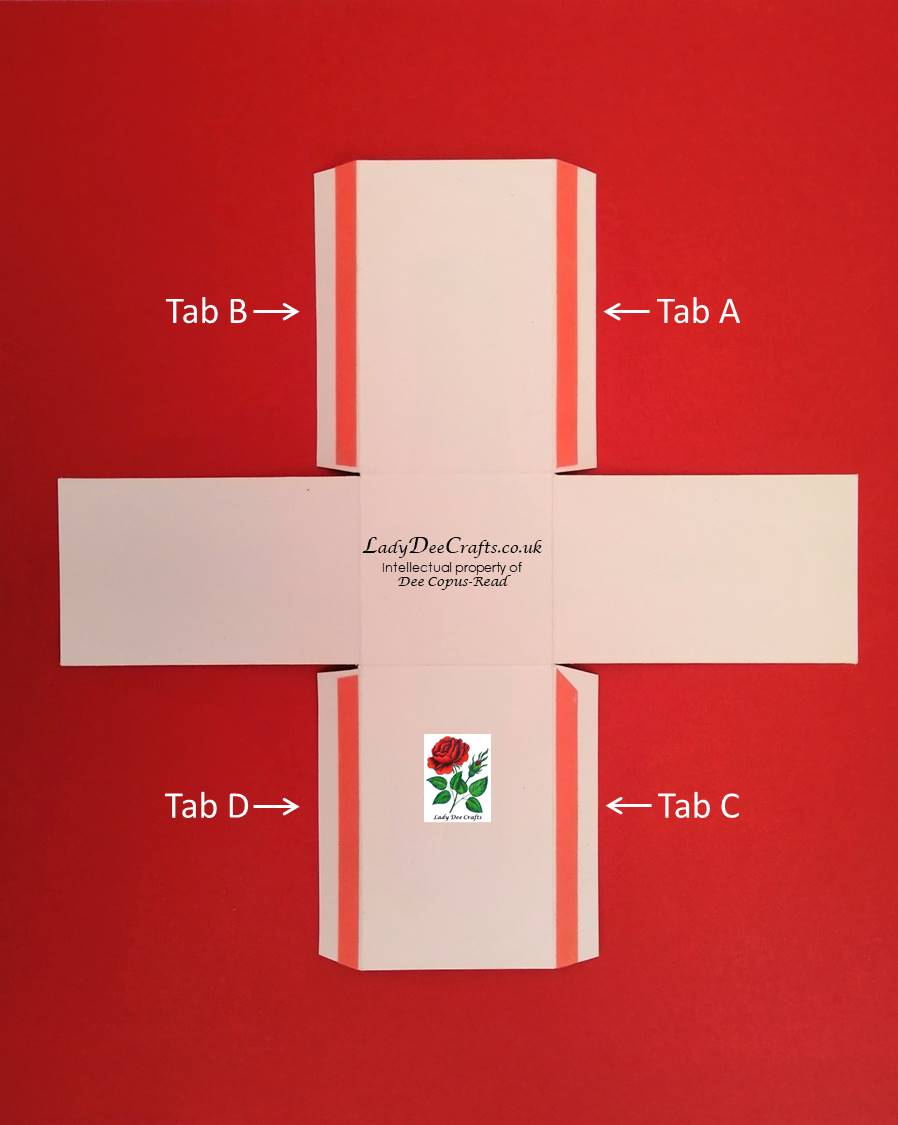
Adhere the tabs and then decide which side you want as the front – they are exactly the same but one side may look better than the other.

Cracker Top Lids
I made 2 styles of lids, an All-in-One lid and a Two-Tone lid. I have included tutorials for both styles.
You can use cardstock or DSP.
All-in-One Cracker Top Lid

Two-Tone Cracker Top Lids
I love this style and depending on which way you use the insert you get a different effect, see picture below.

You can add ribbon or twine to both versions of the Cracker Top Lids and hang them on the Christmas Tree or string them on ribbon to make an advent calendar.
To Make the All-In-One Cracker Top Lid
Cardstock or DSP: 8 ¼” (w) x 4 ¼” (h).
If you are using 8 ½” x 11″ cardstock keep the 8 ½” width (8 ½” x 4 ¼”), this will give you a ½” tab instead of the ¼” tab you get with A4 cardstock.
With the long side at the top of your scoreboard score at 2″, 4″, 6″ and 8″.

Rotate the cardstock 90° clockwise (the narrow tab will be at the bottom of the cardstock) and score at 2 ½”, 3″, 3½”, 4 ¼” and 6 ¼”.

Note: The 2 photos above are just to show the orientation of your cardstock/DSP if it has a directional pattern (this piece of cardstock was cut to size to make the Two-Tone Cracker Top Lid which is shorter).
Place the long side of your cardstock at the top of the scoreboard again and add partial scorelines at 3 ½” and 6 ½” down to the 2nd scoreline. These partial scorelines are in green on the template below.

The black dotted lines in the Cutting Guide template below show which sections need to be removed.

Fold and burnish all the scorelines, the 3″ scoreline is folded in the opposite direction to the rest.

Add double-sided tape to the long skinny tab before using the Envelope Punch Board (EPB)
Starting at the end that doesn’t have the small tab place the cardstock in the Envelope Punch Board, align the 3″ scoreline with the centre of the punch area and punch. Fold the cardstock at the next scoreline, align and punch. Continue until it is all done.

Remember the 4 rectangular pieces of cardstock that I asked you to keep hold of?
You know I don’t like to throw anything away so I used these pieces of cardstock as mats on the Cracker Top Lid, see picture below.

ASSEMBLY
You don’t want the lid too loose, it needs to be a snug fit especially if you are going to hang them up.
1) Add double-sided adhesive to the 3 tabs around the lid (shown with white tape in the picture below).

2) Fold the Cracker Top around the box base, the base should be below the first score line (2 ½” score line).
Adhere the tabs that are either side of the lid first, leave the one at the front for now.

The Cracker Top should look like this so far (picture below).

3) Remove the backing from the rest of the double-sided tape and add liquid glue to the tabs. (see picture below).

4) Adhere the lower section of the long skinny tab first.

5) Adhere the front tab of the lid and then the top part of the skinny tab.

To make the Two-Tone Cracker Top

Cardstock or DSP: 8 ¼” (w) x 4 ¼” (h).
If you are using 8 ½” x 11″ cardstock keep the 8 ½” width (8 ½” x 4 ¼”), this will give you a ½” tab instead of the ¼” tab you get with A4 cardstock.
With the long side at the top of your scoreboard score at 2″, 4″, 6″ and 8″.
Rotate the cardstock 90° clockwise (the narrow tab will be at the bottom of the cardstock) and score at 2 ½”, 3″ and 3½”.
Note: The 2 photos above show the orientation of your cardstock/DSP if it has a directional pattern.
Fold and burnish all the scorelines. If you are using DSP you don’t need to use a bone folder when you burnish.

Add double-sided tape to the long skinny tab before using the Envelope Punch Board.
Follow the steps in the All-in-One Cracker lid tutorial above for the EPB.
For me it was easier to decorate the lid before putting it together.
ASSEMBLY
You don’t want the lid too loose, it needs to be a snug fit especially if you are going to hang it up.
1) Fold the Cracker Top around the box base, the base should be just below the first score line – 2 ½” score line – shown in the picture below.
2) Remove the liner from the double-sided tape and adhere the lower part of the skinny tab making sure it all lines up.

Align the top of the Cracker Lid and adhere the smaller section of the skinny tab.

To make the Insert for the Lid
Cardstock or DSP – 3-3/16″ x 3-3/16″

- Score all 4 sides at 5/8″.
- Fold and burnish the scorelines with a bone folder.
- Cut and mitre the tabs.
- Before adhering anything do a test run to make sure the insert fits, try it in different orientations. *You may need to adjust the size of the cardstock slightly depending on the cardstock or DSP you are using.

For the raised insert

With the front of the cardstock facing upwards add adhesive to each of the 4 tabs and adhere them on the inside of the insert.
- Add adhesive to all 4 rectangular panels on the insert and adhere inside the lid.
For the sunken insert

- With the back of the cardstock facing upwards add adhesive to each of the 4 tabs.
- With this style of insert if you were to adhere the tabs on the inside of the insert, as you would normally do, the tabs would be visible. The tabs need to be adhered to the outside of the insert.
- Add adhesive to all 4 rectangular panels on the insert and adhere inside the lid.
***
I hope you find this tutorial helpful, please let me know by leaving a comment below.
If you would like to enlarge any of the pictures or templates I have used click on the image in the gallery below.
Thank you for stopping by today, I appreciate you spending all this time with me.
Have a great weekend.
Dee x