
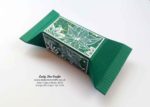
 Today I have the tutorial for making these cute little Sweet shaped boxes.
In my blog post on Thursday I explained that I CASED this idea from Sam at Mixed Up Crafts but I found it too painful for my hands when I was shaping the box the way Sam did it.
To make it easier on the hands I have added some additional scorelines for the diagonal folds which have also made the box find the correct shape a lot easier.

I have also changed the size of the box, this tutorial will make a 5-3/8″ x 3″ box, the ‘box’ part is 3″ x 1-1/2″. It will hold 4 tealights or some fun-size chocolate bars. This box is also self-closing at both ends.
To Make the Box
For this size box you will need a piece of cardstock that measures 6-1/2″ x 6″.
Score the short side first at 1/2″,1-1/2″, 4-1/2″ and 5-1/2″.
On the long side you need to part score at 1-1/2″, 3″, 4-1/2″ and full score at 6″ as shown in the image below. To do the part scorelines place your scoring tool at 1-1/2″ on your scoreboard then place a ruler beside your scoring tool. Keeping the ruler in place move you scoring tool down to the 2nd scoreline and score until you reach the 3rd scoreline. You need to do this again at 3″ and 4-1/2″. In Sam’s video tutorial she shows you how to do this, click here to see her video.

For the diagonal folds you need to part score at 2-1/4″ and 5-1/4″ on both of the 1/2″ scorelines at the top and bottom of your cardstock, as shown above. Place you cardstock on a magazine/notepad and with a scoring tool and ruler score from the part scorelines you have just done to the end of each partial scoreline that’s at 1-1/2″, 3″, 4-1/2″ and 6″. I probably haven’t explained this properly but you can see what I mean in the picture above.

Place the cardstock back into your scoreboard with the long side at the top and score at every 1/8″ down to the first scoreline. Rotate 180 degrees and repeat.
With the short side of the cardstock at the top of your scoreboard re-score the 1/2″ and 5-1/2″ scorelines that are already there.
Fold and burnish the full scorelines and gently pinch the partial scorelines and the triangular scorelines.
Add adhesive as shown above and line up the left hand side of the cardstock to the scoreline of the tab, you will need a strong adhesive like Fast Fuse, Tear & Tape/Red Liner Tape or liquid glue. If you are unsure watch Sams video.
The box should now close really easy, you may need to gently pinch along the partial scorelines again to get crisp edges.

Decorating the Box
I have used Sparkle Glimmer Paper and DSP on my box. If you want to have the 2 layers you will need:-
4 pieces of Sparkle Glimmer Paper or cardstock that measure 2-7/8″ x 1-3/8″.
4 pieces of DSP that measure 2-3/4″ x 1-1/4″.
If you only want one layer you will need 4 pieces that measure 2-7/8″ x 1-3/8″.

I would like to say a big thank you to Sam Clayton for inspiring me to make these cute little sweetie boxes.
I hope you have found this tutorial helpful, if so please let me know in the comments below. If you have any questions you can either leave a comment on you can contact me using the contact form that is in the Contact Me tab at the top of this page. I will get back to you as soon as I can.
If you like my projects subscribe to my blog by adding your email address in the Subscription link at the top of the right-hand column and you will receive my future posts by email. I will not share your details with anyone and you can unsubscribe at any time.
There is a list of the products I used below, if you would like to order any of the products click on the image to go to my 24hr online store.
Have yourself some crafting fun.
Dee x
*When designing a project or when I CASE (Copy And Share Everything) someone’s project I ALWAYS make it with some cheap cardstock first. When typing up lots of measurements mistakes can be made, we are human after all. It doesn’t help that I have Dyscalculia. When making any project I recommend making it first with the cheap stuff.*
This tutorial is the Intellectual property of Diane Copus-Read and is for Personal Use only.
If you CASE this project please be sure to include my name and a link to my website/blog post whether this be on Social Media or any video tutorial or blog post you do. Thank you. Dee Copus-Read x
Product List
|
| |
|
|


Hi Dee,
Thanks for updating this project with the folds… so much easier to close.
Thank you Lorraine. I really struggled making it until I worked out where to put the extra scorelines, I’m so pleased it made it easier for you. I would love to see some photo’s of them. Dee x
Wow, Dee that was quick. Thank you for the directions. I can’t wait to get started making a handful of these for my office.