

Happy New Year!! Did you have a lovely Christmas and New Year?
Geoff and I had a great Christmas, except for our oven breaking on Christmas Eve night. There was 12 of us here on Christmas Day so Geoffs mum and step-dad volunteered to cook the Christmas dinner and then bring it to our house. The meal was amazing and we spent the whole day laughing and having fun.

I must have been really good last year because Christmas morning I found lots of crafting goodies under the tree and Father Christmas even managed to get some Sale-A-Bration items for me too : )
When I saw the Tea Together stamp set in the new catalogue I wasn’t going to get it because I kept my A Nice Cuppa stamp set and Cups & Kettles Framelits dies when they retired. Then I saw the Tea Time framelits dies and immediately had the idea to make shaped cards. I couldn’t get this idea out of my head so I got them.

When giving a handmade card I think it should be in a good quality envelope. When I first started making envelopes they were made with 80gsm printer paper but the envelopes felt ‘cheap’, now I use 120gsm paper that I get from Wilko’s.
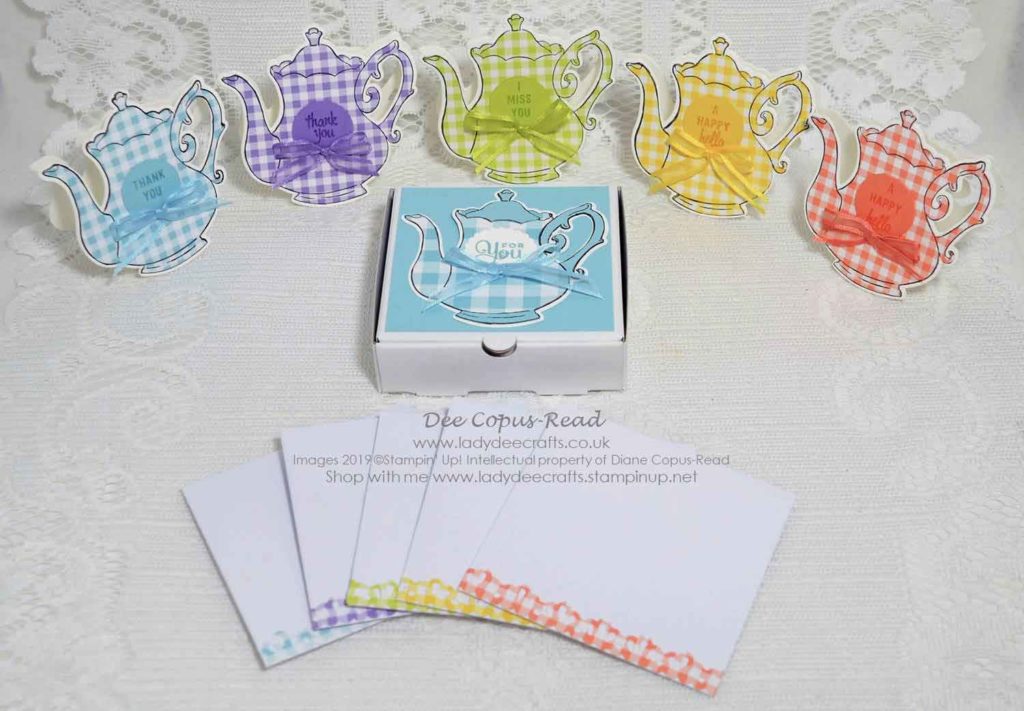
Before making a gift box I tried one of the Mini Pizza Boxes that was sitting on my worktop and it was perfect.
The Tea Time framelits will be in the 2019/20 Annual Catalogue but until March 31st 2019 you can get them for FREE when you place a £90 order.
Do you like my little gift set? Please let me know in a comment below.
I’m definitely going to be making lots more of these to give as Birthday presents for family and friends. These would be great for craft fairs, I think the cards would draw people to your stall. They are so cute how could anyone resist buying them : )
Have yourself some crafting fun.
Dee x
UPDATE: The tutorial for these cards can be found here


Colours Used


Absolutely adorable! Nice work. ❤️
Thank you so much xx
Just wanted to let you know the tutorial for these cards went live today. Dee xx
I also thought that I didn’t want the stamp set or the dies; now I need them!
Oh no .. so sorry. I’ll be praying for him XX
Thank you Sheran. x
Just wanted to let you know the tutorial for these cards went live today. Dee xx
I think I’ve figured it out … but on mine when you turn the card over you can see the lid of the teapot is only the backside of the gingham is that correct?? Thank you 🙂
Hi Sheran, I part die-cut the teapot leaving part of the lid above the fold line of the card. I stamped the Gingham DSP, fussy cut it then adhered it to another die-ct. I then adhered this to the front of the card. I hope this explains it.
I was trying to do a tutorial but our godson, who is like a Grandson to us, had another bleed on the brain and is having surgery tomorrow morning. Dee xx
I love your little tea pots !! I can’t figure out how you cut the entire teapot out and still had a fold by you picture above. Can you explain how you have the entire shape of the tea pot in white and it folds without leaving off the top of the pot?? What am I missing 🙁 thanks so much!!
I had no intentions of getting this set but now it sits in my cart due to your cards here 🙂 I would love to know how you did the teapot on the box. How did you get the gingham in the teapot put the top and handles a solid blue. Thank you!
Thank you for your lovely comment. A lot of people overlooked the dies but my cards seemed to have persuaded them they NEED these dies 🙂
For the teapot on the pizza box I stamped the image on the gingham DSP and on Balmy Blue cardstock and fussy cut them. Dee x
Just wanted to let you know the tutorial for these cards went live today. Dee xx
I Would love to see those photos, because I dont understand completely how you did the die cutting.
Love , love these boxes, how they turned out!
Just wanted to let you know the tutorial for these cards went live today. Dee xx
Dear Dee, thank you for the solution!
So beautiful! But I do not know how you got the white border around the pot.
Thank you for leaving a comment Renate. To get the white border I stamped and fussy cut the Gingham DSP and then adhered it to the white die-cut. Dee x
Love your cute idea! Am I understanding that there is a folded card sandwiched between the front and back tea pot? Or, did you place some area of the pot on the folded paper so it’s connected? Thanks for your help!
Betty—blubasset@yahoo.com
,
Hi Betty, I placed the top part of the cutting edge above the folded card and did partial die-cutting. I have had so many people ask how I did it I’m going to do a tutorial and hopefully have it on my website towards the end of the week. Dee x
Hi Betty, I have added a new photo to the post showing the inside of the card and where I lined the die up with the crease. I hope this is helpful. Dee x
Just wanted to let you know the tutorial for these cards went live today. Dee xx
I can’t wait to receive mine. Did you try using the Note cards? If the die fits then they could be mailed.
Hi, The die does fit on the 5″ x 3 1/2″ note cards but it wastes quite a bit of the note card. If you are going to use the note cards I would cut a piece of card to size and put it in the envelope. I hope that helps. Dee xx
Hi Dee, These are the cutest cards I’ve seen! I would love to see pictures to see how the card opens. I’ve never done a shaped card where the die is above the edge. Does that mean you hand cut the top off?
Hi Karen, Thank you for your lovely comment. I am going to do a tutorial and take lots of photo’s, I will hopefully have all the photo’s on my website by the end of the week. Dee x
Hi Karen, I have added a new photo that shows the inside of the card and shows where I lined the die up with the top edge of the card. Dee x
Just wanted to let you know the tutorial for these cards went live today. Dee xx
Outstanding! I saw your Facebook post and had to come here. Is there a way I can subscribe to your blog? I didn’t see a link to sign up
Hi Bobbi, Thank you so much for your lovely comment. There should be a pop-up asking if you want to subscribe but if not there is a Subscribe to Blog via Email link at the top of the right-hand column. Please let me know if you need any help with this. Dee xx
Really, really adorable!! Such a clever idea🤗
These are gorgeous Dee and something I will be getting during SAB
Love all the products in the Brochure and have a few already. Thanks for your tip ‘re Copy Paper from Wilkos. I am getting short on mine so will take a look.
Love the Gingham Papers they are on my list.
Hugs. xx
Thanks Dee. Looks like you kept the tea pot lid knob and the tea spout above the die cut. Am I right? For sure I’ll let people know about you and your site! Can’t wait to get the die and then to make these………..Jen
On some of the cards I only left the little lid handle above it. It worked but there was a bit too much movement so I moved the die to where you have the first curve at the top of the lid and lined it up with the crease of the cardbase. I hope that makes sense. xx
Hi Jen, Hopefully the new photo I’ve added at the bottom of this post will help explain it better. Dee x
Just wanted to let you know the tutorial for these cards went live today. Dee xx
Dee, these are darling. I kept saying there wasn’t anything I wanted in the SAB catalog since I got everything I wanted at Onstage, but seeing these I am falling in love. They are so cute. I’m thinking I need to do them for my upcoming workshop. Might have to look into those pizza boxes as well. Thanks for the idea and know that I will give you full credit for the inspiration. Thank you, Thank you Thank you. Leslie Markland
Hi Leslie, Thank you so much for your lovely comment, I am so pleased you like them. They would definitely be a great project for a workshop and the Pizza Boxes are a perfect size and not expensive. I would love to see some photo’s if you make them at your workshop, if you don’t mind sharing them with me. xx
Love these! Trying to figure out how you got the front attached to the back?? How did you do that? Really want to case this if that’s ok with you? Thanks………Jen
Thank you Jen. You are welcome to CASE anything I make, all I ask is that you let people know where the original idea came from and add a link to my blog post.
To do the card bases I did partial die-cutting. In this case you leave part of the cutting area of the die above the card fold and then it won’t cut through it. If you have any more questions or if you would like me to take a photo to explain it better please let me know. xx